We have recently survived a 4 week bout with sickness. Both my husband and I were struck down and unable to eat, drink much, or get up for days. I don't know what we had exactly, a virus? No one else had what we did... Hm-m-m... we don't know for sure, but what we do know is that we never want to be sick like that again!
Unfortunately, I was not prepared for cold and flu season like I should have been. I am very late getting my tinctures made so we were ill equipped to fight off illness or to treat the symptoms once we were sick. My old standby
essential oil blend helped of course, but we came down so fast it really didn't get a chance to work its magic before we were out for the count.
My grandmother's old saying, "It is a little late to close the barn door after the animals have gotten out..." rang in my ears as I kicked myself for not having the tinctures done in September. I vowed to get them done ASAP, but had to wait until I was well enough to drive so I could go to the liquor store for grain alcohol. No...I wasn't going to drown my sorrows in
PJ's, I needed the grain alcohol for making tinctures.
There are several tinctures that I like to have on hand for staving off sickness in the fall and winter. Both my youngest son and I have issues with bronchial asthma, so we lean heavily on Yerba Santa for its expectorant, bronchial dilator and antimicrobial, properties. It is the first thing I reach for when one of the family is dealing with respiratory problems. In order to boost immune response when coming down with something, I look to Echinacea. Olive leaf is indispensable as an anti-bacterial, anti-viral, anti-fungal, and immune-booster. In the future I hope to highlight each of these herbs and detail their benefits, but today I want to show you how simple and economical it is to make your own tinctures.
To make your own medicinal herbal tinctures you will need the best quality herbs you can obtain. I order most of mine from
Mountain Rose Herbs or
The Bulk Herb Store. Both have high quality herbs, lots of information, and tutorials. You will also need at least 90 proof clear alcohol, like vodka. I use 190 proof grain alcohol for the extraction process and then add water to dilute when I am ready to bottle the tincture.***WARNING! Grain alcohol and Isoprophyl alcohol are not the same!!! Grain alcohol is an alcoholic beverage and is purchased where you find other alcoholic beverages, Isoprophyl alcohol or wood alcohol, is a disinfectant and is poisonous. Drinking Isoprophyl alcohol can lead to blindness and possible death.*** There are a few kitchen items that you will also need: a wide mouth pint canning jar, a two piece lid and band or a plastic screw top lid that fits a wide mouth jar, a plastic funnel, a bamboo chop stick or skewer and a pen, some adhesive backed labels and transparent tape.

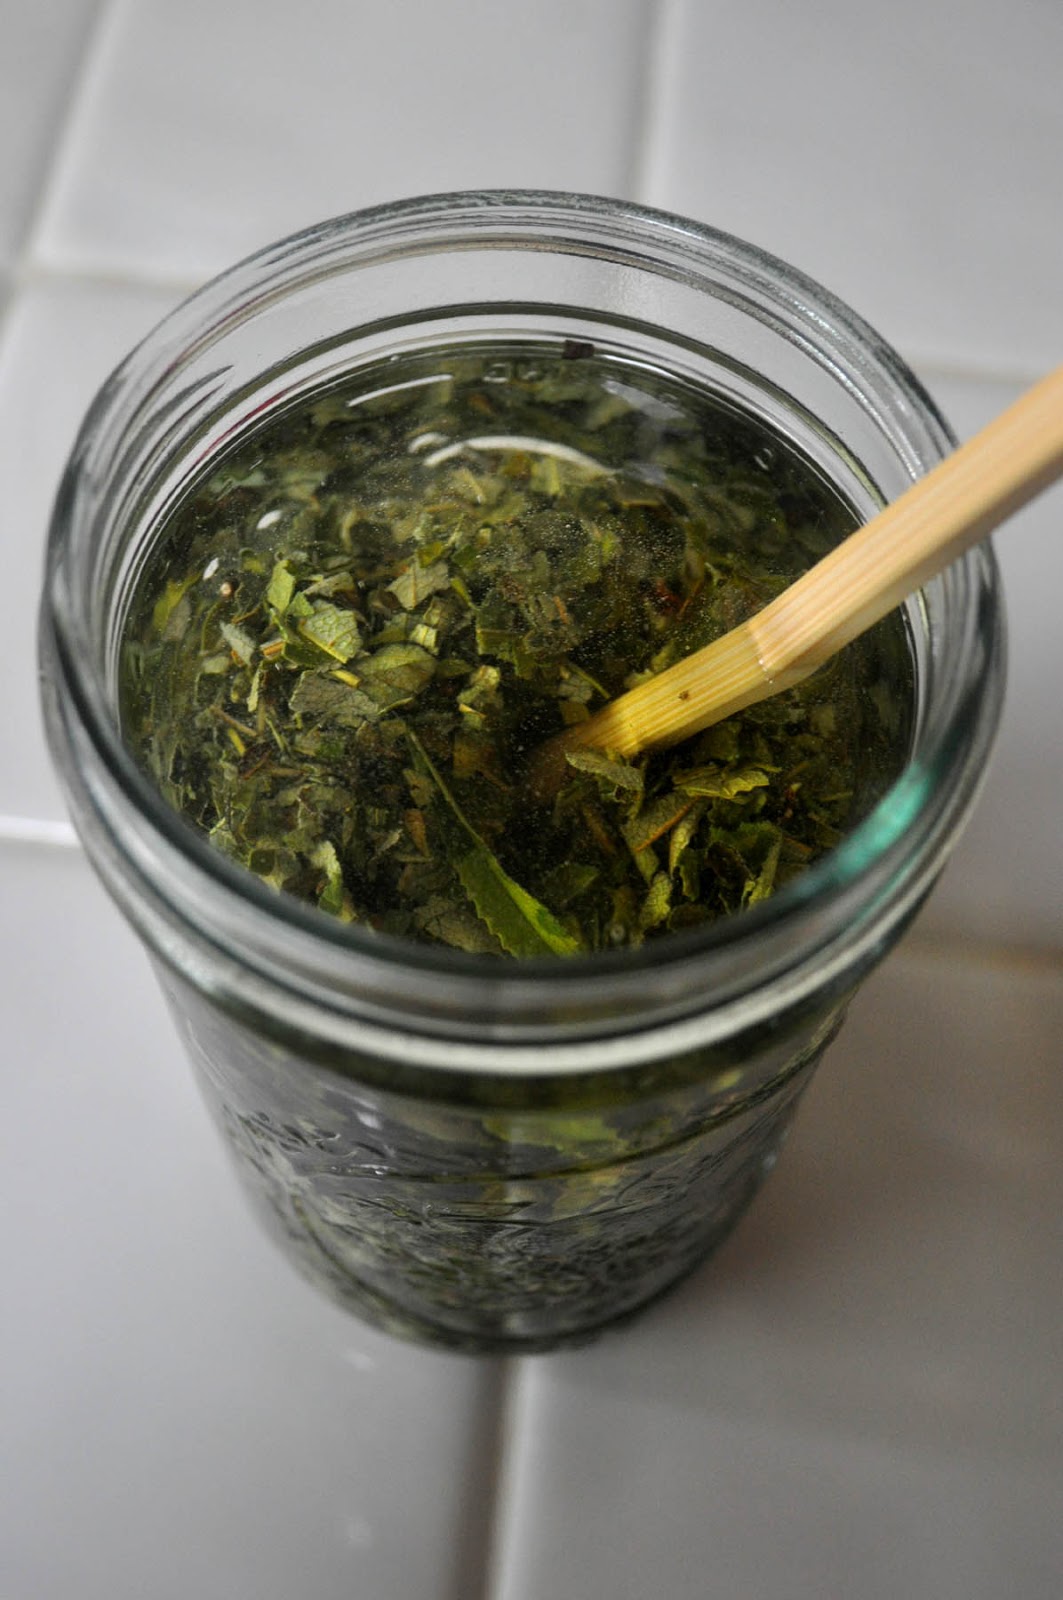
Fill the jar 1/2 way with the herb of choice. If it is a light weight, fluffy herb, then press down slightly and fill again to the halfway mark. Do not pack tightly, since the herbs will soak up the moisture and swell in time.
Pour the 190 proof grain alcohol over the herbs and fill the jar to where the screw threads on the jar begin, about 3/4 inch from the rim of the jar. You may need to top off the alcohol during the first day or so, as air bubbles dissipate and the herbs soak up the alcohol. It is necessary to keep the plant material covered with alcohol or it could spoil. Stir with the bamboo stick to dislodge air bubbles and uniformly wet the herbs, taking care to break up any clumps of herbs. Top off if the level of alcohol drops below the screw threads.
Write out on a label the name of the herb, the day you started it and the day the tincture will be ready,(the ready date is 6 weeks after the start date). Also note what kind of solvent was used for the tincture. Vodka is only 90 proof and has already been diluted, grain alcohol is 190 proof and will need to be diluted before use, so noting what alcohol you used will help you avoid dilution mishaps later.

Screw the lid on tightly, invert once or twice and then wipe the jar with a clean, dry towel. Apply the label and then cover the label with tape if desired. The tape will prevent ink from running if the jar gets wet during the tincture process. I have found that the two piece lids are water tight, but the plastic lids can sometimes leak around the edges, so I just cover the label to be safe. It is very frustrating to have ink run and the identity of a tincture be in question. If you are doing more than one kind of tincture at a time it might be difficult to tell one from the other if the labels are ruined.

Finally place the jars out of direct sunlight and invert the jars daily to move the herbs around in the alcohol. It is a good idea to put them somewhere that they will be seen, to remind you that they need daily attention . The jars should be inverted at least once a day everyday for a week, at this point they can be put in a cabinet out of the light and out the way, but need to be inverted several times a week for the remaining 5 weeks.
Now for the savings...
A one liter bottle of grain alcohol is about $18.00, for one wide mouth pint jar half filled with herbs, you will use 8-10 oz. of alcohol, so we will say the cost of the alcohol for one tincture is $5.50.
The herb prices will vary by herb, so I will just give you the cost of the Yerba Santa. I purchased 8 oz. of dried Yerba Santa for $7.50. Of the 8 oz. I bought, I used 4 oz. for a pint of tincture, the cost of 4 oz. of Yerba Santa was $3.75. The total amount of tincture that is rendered from the herb/alcohol mix varies depending on how well the tincture is squeezed from the plant matter when straining. I will say for 4oz. of herb and 10 oz. of alcohol, 8 oz. of tincture is produced and 4 oz. of plant matter goes in the compost. That makes the total cost $9.25 for 8 oz. of tincture
solution. If the tincture is made with 190 proof grain alcohol then the end product will be diluted 1 to 1 with water, which will make the cost of 8 oz. of tincture $4.63. The finished tincture needs to be kept in a dark place. I would keep the bulk of the tincture in a canning jar in a cool dark cabinet. For use I would purchase some 1 oz. amber dropper bottles and keep one oz. ready for use in the medicine cabinet. Mountain Rose Herbs sells individual amber dropper lid bottles for $1.15. The cost of home made tincture is 59 cents per oz. plus $1.15 for each bottle used. Which makes the cost per bottle $1.74. This cost does not reflect shipping costs, since that will vary with the size of the order. For comparison I looked up the price of a 1 oz. bottle of Yerba Santa tincture on several sites, the average cost was about $12.00 for a 1 oz. bottle, plus shipping, (average of $5.95). So by making your own tincture you have saved yourself $11.41 per oz. (plus the cost of 1 bottle), times 8 oz.of tincture plus another $5.00 or so in shipping. Wow...
One benefit that can't be factored out in dollars and cents is the
satisfaction that you get from being involved in the whole process of
keeping your family well. The experience that you gain and the
confidence that you have in the strength and purity of the product you
are giving to you family, can far outweigh the cost benefits of making
your own remedies. If you are concerned about what to do with 8 oz. of tincture, don't worry, dried herbs only have a shelf life of about a year before they lose some of their potency, but herb essence preserved in a tincture of grain alcohol will last for years. If you find you have more than you need, I am sure that there are family and friends that can share the wealth! If the amount produced is really a concern, you can always cut the recipe in half.
Part Two of this post will be published when the rest of the supplies I
ordered come in. Until then, why don't you give making tinctures a try!
Let me know how it goes...I would love to hear from you!
**As a side note, In some states sale of 190 proof grain alcohol is
illegal. Here in North Carolina it is was made illegal a few years ago,
so now I drive to South Carolina, (I am very near the border so it is no
biggie for me). 90 proof vodka will do the job, if you can't obtain 190 proof grain alcohol.**
Blog Hops this post is linked to:
Wildcrafting Wednesday #77
Frugally Days Sustainable Ways #67
Wildcrafting Wednesday #14
Home Acre Blog Hop #13
Farm Girl Friday Blog Hop #103
Busy Bee'a Blog Hop #11
Farm Girl Blog Fest#28
Strangers and Pilgrims Herbal Linkup
This blog entry is intended to be available only to persons above the age
of 18, or the above age of majority in your country. By accessing the
content of the blog, by clicking on any related or third party links, you certify that you are over 18
years of age, or that you have attained the age of majority.
Content available from this blog or from linked related or third
party sites, is intended to be available only to the residents of those
countries that allow such health related guiding content to be freely
circulated.
The information contained in this website is presented solely for
general informational purposes so that you may learn more about the
subject. NOTHING CONTAINED IN THE BLOG IS INTENDED TO CONSTITUTE, NOR
SHOULD IT BE CONSIDERED, MEDICAL ADVICE OR TO SERVE AS A SUBSTITUTE FOR
THE ADVICE OF A PHYSICIAN OR OTHER QUALIFIED HEALTH CARE PROVIDER. WE
MAKE NO ASSURANCES OF THE INFORMATION BEING FIT OR SUITED TO YOUR
MEDICAL NEEDS, AND DISCLAIM ANY IMPLICATIONS OF ANY CONTENT OR
ADVERTISEMENT ON MY BLOG BEING FIT AS PER THE PRACTICE OF MEDICINE.
NOTHING CONTAINED IN THE BLOG IS INTENDED TO GIVE RISE TO, NOR SHOULD
IT BE CONSIDERED AS GIVING RISE TO, A DOCTOR PATIENT RELATIONSHIP.

 It is a beautiful day today, The skies are clear for a change and the weather is warm, only the breeze is chilly. It hardly seems necessary to worry about fending off illness when it seems that spring is here and hopefully "cold and flu season" is over. But with spring comes allergy problems and the secondary infections that may follow, so we aren't out of the woods yet, it is wise to have your infection fighting medicinal herb tinctures ready at hand.